System users with Administer Permission (the System Controller sets permissions), can access and use the programs in the Admin Section.
The Service Plan is an extensive and detailed program, whereby case managers and counselors can set up and chronicle the goals, tasks and outcomes of the services provided to applicants.
In short, applicants come to you with goals. Your case workers / managers assign them tasks to help them meet those goals. Then the case managers chronicle the results (outcomes) of those efforts.
All of this activity is then captured in the completely detailed: Excel Service Plan Report, available in the Reports Directory.
Here is where management (normally) can set the parameters, actually create the choices for goals, tasks and outcomes. This set up is done, so it then becomes a very simple task for a case manager to (on an applicant-by-applicant basis) track and manage all his or her individual applicant service plans.
![]() Click the Admin Icon on the top of the system page for links to Programs.
Click the Admin Icon on the top of the system page for links to Programs.
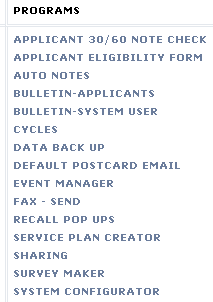
Click the SERVICE PLAN CREATOR link.
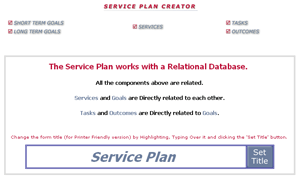
This is a very extensive tool for the precise creation of the Service Plan (SP) format at your organization. The program has step-by-step instructions throughout it's pages, but we'll cover it all here as well.
Managers: Take solace in the fact that all your work, setting the SP parameters, will be rewarded with substantial time saving, and accuracy in your SP tracking. In addition, your staff may very well appreciate your efforts, and erect statues or monuments to you, in your park or town square. Please send us photos of these for our collection!
STEP BY STEP...
Create Short and Long Term Goals
Short and long term goal creation both work exactly the same way. Click the Short or Long Term Goal link.
![]()
There are 3 steps to create goals.
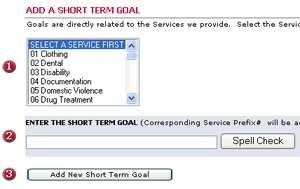
1-Select the service the new goal is to be related to. For example, a short term goal of Get a new shirt. would be related to the 01 Clothing service. So, select 01 Clothing from the dropdown.
2-Type the goal (Get a new shirt. in our example) into the text box. Spell Check it if you like.
3-Click the Add New (Short or Long Term) Goal button.
Pretty easy, so far? Don't get complacent. The incredibly difficult part is coming up soon.
BTW: Once created: As usual in the system... ![]() Edits the Goal and (if available, I.E. NO ONE HAS AS YET CHOSEN IT)
Edits the Goal and (if available, I.E. NO ONE HAS AS YET CHOSEN IT) ![]() deletes it.
deletes it.
Enter New Services (if need be)
Outcomes starts you off with 37 of the more common services provided by organizations. You may never need to add any more. But, if you do, here is one of the places you can do that. (There is also a Data Dropdown list selection, in the admin section, called: Referral Agency Service, where you can add or edit service names. NOTE: YOU CAN NOT EDIT OR DELETE ANY OF THE 37 ORIGNAL SERVICES PROVIDED.)
Click the Services link.
![]()

1-Type the service into the text box. Spell Check it if you like.
2-Click the Add New Service button.
Granted: No rocket science here! Wait. It's coming.
Assign Tasks to Help Meet Goals
These are the tasks, your case managers will assign to applicants (think of it like school homework) to help them to attain their goals.
Click the Tasks link.
![]()
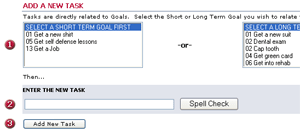
1-Select the goal (Long or Short Term) this task will be related to. In our running example, a task of Get size measurement. would be related to the goal we created 01 Get a New Shirt. So, select the short term goal 01 Get a New Shirt.
2-Type the task Get size measurement. into the text box and Spell Check it if you like.
3-Click the Add New Task button.
Create as many tasks, related to as many goals, as you like. (Note: Be advised, on the system user side, if they need a task you have not created... System users can create them on the fly. See the Service Plan section for detail on this, and all aspects of how case managers interact and use this part of the program.)
Still, up to this point, you'll have to admit: A degree from M.I.T. is not required to operate this program. Don't worry, the really hard stuff is yet to come.
Adding Outcomes (Positive and Negative)
When your organization implements a service plan for an applicant, your case managers... List the applicant's goals, Assign tasks to help meet those goals and Note the Outcome (results) of those efforts. Outcomes, therefore, can be positive or negative. For instance, a positive outcome in our running example of trying to 01 Get a New Shirt would be Positive: Got a new shirt. Duhh!
It is possible, however, that you tried to help an applicant realize a goal but were unsuccessful. (Ah life, such as it is.) Then the outcome might be... Negative: Too fat for anything in inventory.
Let's run with that one.
Click the Outcomes link.
![]()
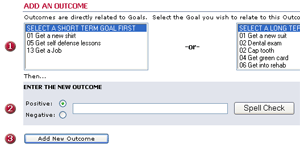
Outcomes, of course, are related to goals. So, first...
1-Select the short term goal 01 Get a New Shirt.
2-Select whether the outcome is to be positive or negative. Then type the outcome Too fat for anything in inventory into the text box. Spell Check it if you like. NOTE: DO NOT TYPE IN THE WORD POSITIVE OR NEGATIVE, THAT'S HANDLED BY THE OPTION BUTTONS.
3-Click the Add New Outcome button.
So far, the hardest part of this whole program is to remember not to type the words POSITIVE OR NEGATIVE!
Oh yeah, and in case you didn't realize it yet... No need to type in the numbers you see either. The program does it for you.
BTW: Numbers represent the # of the service on your services list, and is one of the magical ways we keep track of all this, and get it straight on the Excel report.
CAUTION! EXCRUTIATINGLY HARD PART NEXT!!!!!!
Brace yourself, here it comes.
Set the Form Title
As you probably know, or have guessed by now, all this work around an SP is actually a form generator. Most organizations have an applicant sign a copy and keep it in their files. There's a printer friendly version available in each applicant file. See the Service Plan section for more on this.
Well, you probably won't believe this but, some organizations feel the title 'Service Plan' is somehow not as politically correct, or descriptive as they'd like. And they want to name the hard copy something other that 'Service Plan.' (Go figure?)
Who are we to argue?
Wherever you are in the program, you can click the following link.
![]()
Where you'll find...
![]()
To change the form title: Type over the words 'Service Plan' and replace with whatever will fit in the space. Then click the Set Title button. That's all folks!!
Just so you're not convinced I have brain damage...
I don't really think that is (or anything in the program is, for that matter) difficult. But I will admit that this help section is long, and maybe even a little boring, because it's so easy. (If you were bored reading it, imagine how bored I was writing it! So all that stuff about a difficult section was just to have some fun and keep my sanity. You won't find stuff like this in the rest of the help manual unless, however, I get bored again.)